Pages Menu
Categories Menu

Posted in Top Stories

Inline Contact Resistance Solves Wafer Probing Challenges

By Dave Armstrong, Director of Business Development, Advantest America, Inc.

Testing is increasingly being conducted at the wafer level as well as at lower voltage levels, necessitating even greater test accuracy. Achieving this accuracy is often hampered by poor contact resistance (Cres). In this environment, conventional continuity tests – in which current is applied in parallel to all pins and per-pin diode voltage is measured to verify continuity between the tester and the internal die – are not adequate for determining yield limiting contact problem. Moreover, they have no value in determining potential issues with probe card degradation over time.

Probe cards often are subjected to offline electrical contact resistance measurements, but contact resistance grows as the probes become dirty. As wafer probing progresses, if one pin starts to make poor contact, the situation will worsen, resulting in a large quantity of potentially good parts being turned away. To prevent the impact of accumulated residue affecting probe and test quality, inline contact resistance is becoming essential. Similar to the shift toward inline process control that became industry-standard in the early 2000s, measuring contact resistance inline will serve to mitigate the problem of dirty or damaged probes, unlike continuity testing.

Key industry trends

Moving to inline contact resistance is critical for a number of reasons. First, systems-on-chip (SoCs) face a daunting roadmap for wafer probing, as Figure 1 indicates.

Figure 1. The International Technology Roadmap for Semiconductors (ITRS) spotlights significant challenges for wafer probing through 2020.
*International Technology Roadmap for Semiconductors 2015
**Full Wafer Contact

The data shown in the table for 2016 – 66,000 individual probes making contact with one die – was fairly conservative. Today, the industry is exceeding those numbers, which were published in 2015, by more than 150%. Every probe must be clean and accurate, and therein lies the challenge. Sometimes, the same die is being probed three to four times – perhaps at a different temperature each time – and each probe kicks up oxide “dirt.” In addition, dirt accumulates as the probe moves across the wafer (through the lot) since the same probe is used for each die on the wafer. It’s a problem of numbers, repeatability and trends for a series of wafers and a series of die.

Further complicating this, engineers are now doing more than final test at wafer probe, e.g., at-speed testing and Known-Good-Die (KGD) testing. Getting to KGD is, of course, the ultimate goal – they want to touch down on the die and know that everything works before packaging. This is not easy to achieve. More types of testing, such as high- and low-temperature tests, must be performed – all of which will be challenged by poor contact resistance.

Moving to contact resistance measurements is also critical because of the need to accommodate probe planarity issues. In the environment of the ATE, the probe needs to be held in as planar a manner as possible while, at the same time, a force of 200kg or more is pushing down on the probes. This pressure will cause the probe assembly to bow, making true planarity difficult to maintain. The probe micrograph in Figure 2 provides an example of this problem. The contact resistance in the center of the die was much higher than at the periphery, and much lower at the southern edge. The culprit: bowing up in the center of the die, which created a balloon effect that caused the center and part of the northeast portion to be bad. While a reading of anything less than 8 ohms is considered acceptable, high-power probing requires less than 4 ohms, making Cres requirements much tighter in high-power and extreme-temperature environments.

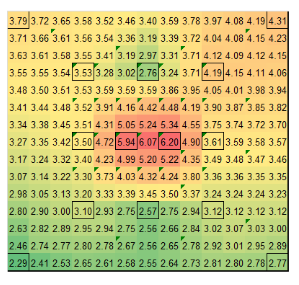
Figure 2. This example contact resistance (Cres) plot clearly shows bowing in the center of the probe.

Contact resistance measurement process

The diagram in Figure 3 represents circuits typically found in a variety of devices, each of which can benefit from inline Cres measurement. While many readers will be familiar with these diagrams, here is a brief summary of each type: 3a is a traditional I/O circuit with two diodes, one connected to a power supply and one to ground; 3b is similar, with a resistor added to each diode in series; 3c consists of one large diode with a resistor in series; 3d contains a single diode going to ground only and not a power supply; 3e is the opposite, with the diode going to the power supply and not to ground; and 3f represents the class of interfaces known as SerDes, used in high-speed communication. These circuits are unknowns in many respects – they are very different from any other type of circuit and by far the most difficult to assess for contact resistance.

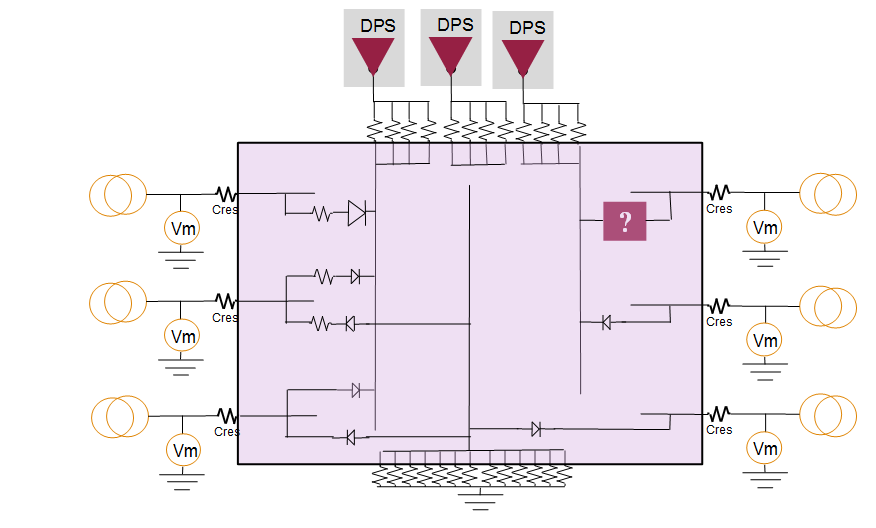
Figure 3. Each type of circuit illustrated in this black box diagram can benefit from inline Cres measurement.

Inline contact resistance measurements can be performed in a variety of ways. Using standard digital pin parametric measurement unit (PPMU) resources enables tracking changes to contact resistance – either over time or positionally. To measure the contact resistance of I/O pins, the engineer basically forces currents, measures voltages, and then performs calculations to determine Cres.

Conceptually, Cres is calculated using this equation:

*************

can be calculated by looking at the diode equation:

**************

Which can be reordered to calculate the change in diode voltage:

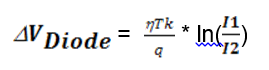
The challenge with this equation is what value to use for diode ideality η. This value is not a constant, it varies with technology, process, and transistor geometry. All the other values are known, e.g., q = transistor charge, k = Boltzmann constant, T = die temperature, etc. Because, as noted above, different device pins have different (or no) diodes, the diode configuration becomes critical when trying to determine the value of η. Since diodes may exist to ground, supply, or both, either positive currents/voltage or negative currents/voltage may need to be used in order to obtain valid Cres measurements.

The curves for each pin type also need to be individually analyzed to solve for diode ideality η. Once determined, ideality values don’t seem to change for a given process and design. However, ideality values can vary broadly – the pins shown on the graph in Figure 4 have idealities between +60 and -2.6. Many different pins are superimposed on top of each other, all showing very different performance. The key point to note here is that, when the correct value is determined for η, Cres doesn’t change with different current levels.

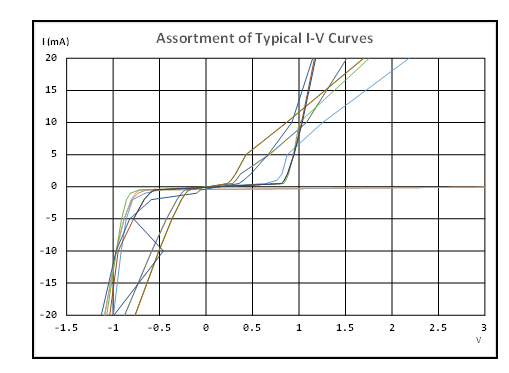
Figure 4. By looking at this plot, the test engineer can determine which type of ESD protection circuit is being employed, and use portions of the plot to calculate η.


Determining values for η

The process for determining η involves the following steps:

  1. Force different currents into and out of all DUT pins and measure the voltage. For the purpose of this article, the currents selected were ±20mA, ±10mA, ±5mA, ±2mA, ±1mA and ±0.5mA.
  2. Select three positive or three negative measurements, and calculate ideality using this formula:
  3. Try different current values in the equation to check if the ideality stays relatively constant. With the right value for η the result will change very little. Also, all pins with a similar I/O buffer design will have the same η value.
  4. Perform a final check of the ideality selected by using the value in the Cres equation. The resistance value should be positive and will not change with different current levels.

At this point, production measurements of Cres can be performed by simply performing two current force and voltage measurements (of the same polarity that was used for calculating Image) and then performing the following calculation for Cres:

Example Cres measurement results are shown in Figure 5. Measurements were taken at two different force levels (140 lbs. and 92 lbs.), and on a pin-by-pin basis, Cres rose by about 2 ohms between them. The orange plot at 69 ohms highlights a failure in the making. Cres should be lower with higher force, so this tells us that the contactor bowed.

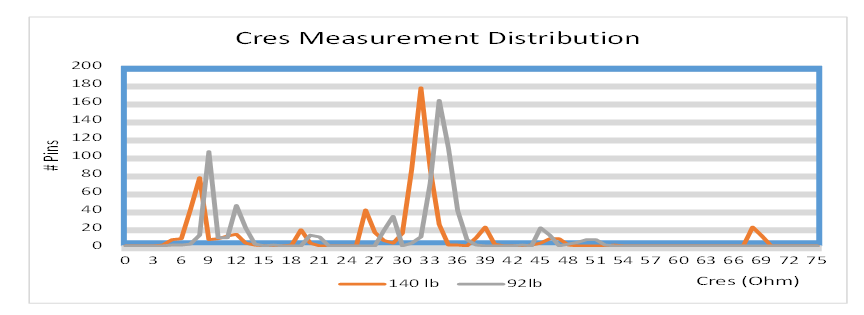
Figure 5. This graph provides the distribution of measurement results obtained at two different overdrive levels. Pins with resistors in series with their ESD diode are clearly visible at ~ 33Ω. Those without are at ~9Ω.

Determining Cres of SerDes pins

SerDes pins are difficult to analyze. They often have, pre-emphasis and equalization circuits on the inputs and outputs to match the on-die circuitry to their transmission lines. This greatly complicates conducting Cres measurement on these pins.

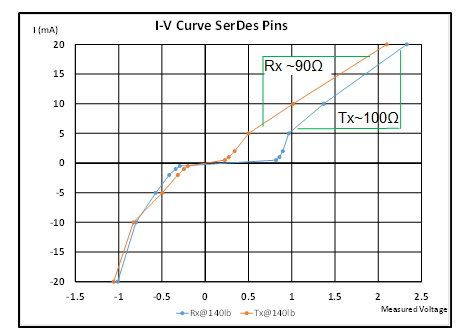
Figure 6. Changes in termination resistance values can help determine Cres for SerDes pins.

As seen in Figure 6, on part of the I-V curve, the slope of lines is about 100 ohms, as SerDes pins typically have termination resistors of 100 ohms, so the I-V curve will show this resistance, not Cres. The good news is that these termination resistance values do change with Cres changes – so the engineer can measure nominally 100 ohms using traditional Ohm’s law equations without the diode voltage adjustment, and then watch to see if the measurement value increase as the Cres degrades.

The test methods described so far are all two-terminal inline test methods. It’s important to recognize that two-terminal measurements will inherently include additional resistances in addition to the key Cres value to be determined. This is shown in Figure 7.

Figure 7. Two-terminal contact resistance stray values are compensated for over time.

While the test system is designed to compensate for all the resistances in the grey fields, it cannot compensate for the green resistors. As a consequence, the Cres values measured by these techniques will 1) be higher than normally expected, and 2) vary from pin to pin due to fixture design differences. The best way to deal with this situation is to simply save a baseline set of Cres as measured by these two-terminal techniques and then monitor the difference between the baseline and the Cres values measured over time.

Determining Cres of supply pins

A supply’s contact resistance can also be measured using a PPMU and a device power supply (DPS) monitor pin. In connecting the DPS in the test system to the DUT pins, it is becoming common practice to connect one of the DUT supply pins to a digital PMU pin. In addition to providing an enhanced ability to monitor the on-die supply voltage, this approach allows direct measurement of Cres from the digital pin to the DPS signal itself, and thus, direct calculation of the contact resistance average value for the DPS interconnection. Using the monitor pin, a simple I-V curve is observed (Figure 8) which allows straightforward calculation of the Cres. Complicating this for high-power designs is the very large number of supply pins in parallel. While this technique will still measure the average contact resistance it is less sensitive to changes in Cres at the per-pin level.

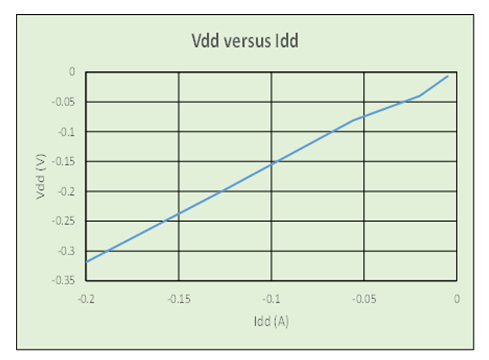
Figure 8. I-V curve for supply-pin Cres measurement. The sensitivity of this measurement to single-pin Cres issues drops as a large number of probes are connected in parallel.

Determining Cres of ground pins

This designed-in capability is unique to Advantest. In power-supply modules, a current is forced through a primary path, and then another path is used to sense voltage-out on the device under test (DUT) board. One of the available modules for the V93000 test system is called the UHC4. The UHC4 has a contact resistance monitor circuit built directly into the supply, giving it the unique ability to measure the voltage difference between force and sense right in the instrument (Figure 9).

Measuring a low value of resistance requires a high current (i.e., measurements must be taken during a power-up condition). As a simple example: with the part in an active mode, consuming, say 100 amps, a 1-volt change across the pins tells the user that all resistors are exhibiting 10 milliohms of resistance. A shift in the resistance indicates a ground connection problem. Continually monitoring the module will provide a good level of sensitivity to any big issues that arise.

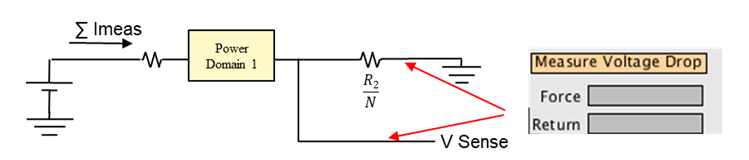
Figure 9. The V93000 UHC4 module is uniquely able to measure voltage difference between force and sense.

High-accuracy Cres measurement

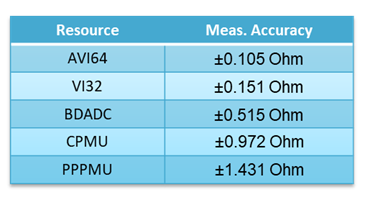
Using the precision DC measurement resources available in the V93000, high-accuracy Cres measurements can be made using thermal measurement diodes with four-terminal techniques. Several resources can be used to make these measurements. The results of a Monte-Carlo analysis of the measurement Imageaccuracy with the available instruments are provided in the table at right, which clearly shows the benefits afforded by Advantest’s DC-scale AVI64 universal analog pin module over the per-pin PMU of the PS1600.

In summary

The Advantest V93000 is able to measure both inline (2-terminal) and high-accuracy (4-terminal) contact resistance. These measurements will become more critical as the industry moves to higher pin counts, higher power levels and lower voltages. Expanded testing at the wafer probe will also drive this trend, as will extreme-temperature testing, which makes everything more difficult.

Read More

Posted in Top Stories

Scalable Platform Key to Controlling SSD Test Costs

By Ben Rogel-Favila, Senior Director, System-Level Test, Advantest America

Manufacturers of solid-state drives (SSDs) want to keep test costs under control even as device performance, density, and variety all increase. In addition, the SSD product life cycle is accelerating. Test equipment manufacturers must strike a reasonable balance here.  They must provide more capable but less expensive systems that can cover a wider variety of devices.  One approach is to make the test system modular and scalable, so companies can buy what they need now and add on later as they need more features and more capabilities.  Another approach is to define more parameters and device characteristics in software rather than in hardware, providing more flexibility and allowing upgrades and changes to be made locally without buying an entire new system.  Additionally, the value-add of test equipment is moving beyond traditional “test electronics.” SSDs present a variety of unique test challenges, all of which an SSD test platform must address while keeping test costs in line.

How test affects time to market

Time to market (TTM) is a critical metric in terms of new product success. Manufacturers must hit the market window as early as possible – later entry means realizing less profit. This concept is well understood. So, what role does test play? In the SSD space, a reliability demonstration test (RDT) must be performed to qualify the product. If this step isn’t done correctly, it can affect TTM. To ensure that device testing doesn’t hinder TTM entry, manufacturers must recognize that their device will have some issues – the sooner they’re identified, the greater the chances of achieving optimal TTM.

Several factors can help mitigate these risks. First, it’s essential to employ a thorough set of engineering tools that can help pinpoint more quickly and accurately where any problems lie. Also required is the support of the tester provider. Test products are highly complex, comprising hardware, software and firmware all interacting with one another, so having someone competent in these environments actively supporting efforts to find these problems is key.

Next is test development – a significant undertaking that requires a robust environment able to accommodate the different test stages that a device undergoes during its lifecycle. If all the same tools can be applied at each stage, testing becomes easier and much more efficient. Finally, being able to reuse the test throughout all the various test cycles also saves time, as well as helping minimize the introduction of new test conditions from engineering through production. The bottom line is that test can substantially impact TTM, and if not done correctly, this impact can be negative.

SSD test stages and requirements

An SSD is put through a range of different tests during its lifecycle, each of which has different objectives and different needs. The SSD test lifecycle involves two distinct test stages. The first stage is focused on engineering/R&D, the second on manufacturing (see Figure 1). In stage 1, once the developer has confirmed the product design is correct, he or she must very that the design architecture lends itself to a reliable product. Once these steps are completed and the RDT conducted, the design is ready to move into stage 2, high-volume manufacturing (HVM). Following assembly, two tests are typically employed: built-in self-test (BIST) and full-speed (or, at-speed) functional test. Being able to utilize a single test solution throughout these stages helps ensure both test process consistency and quality of results.

Figure 1. SSD lifecycle test stages

Figure 2. SSD test requirements include a wide range of variables.

The test requirements for SSDs comprise a wide range of variables that span many different engineering disciplines, as shown in Figure 2:

  • Different protocols – As we have examined in prior articles, SSDs make use of several different protocols, e.g., Non-Volatile Memory Express (NVMe), PCI Express (PCIe), Serial Attached SCSI (SAS) and Serial ATA (SATA), which vary significantly in functionality.
  • Different form factors – Testing chips is essentially the same process, regardless of IC shape or sizes. With SSD, form factors range from heavy, 8-inch PCIe cards to small, gumstick-sized M.2 devices, which are very fragile; the same system must be able to test each type of SSD.
  • Different test methods – As mentioned above, a robust system is needed to perform both BIST and functional testing.
  • Different speeds – This is a key requirement. System complexity and cost rise exponentially with increased device speed. With SSDs, speeds currently range from 1.5 Gigabits/second (Gbps) to 12 Gbps, with 16 Gbps (for PCIe Gen 4) and 22.5Gbps (for SAS 24) on the horizon.
  • Enterprise vs. consumer – This distinction is important because, at least intuitively, we can assume enterprise has a bigger budget for test given that the price tag for enterprise-level SSDs is about 50x that for consumer-level products.
  • Manual vs. automated – All SSD devices are being tested manually today, but as volumes increase, three things are happening: a) demand is growing at a rate that makes continually adding operators not economically feasible; b) operator error is growing in parallel with the number of operators; c) operator turnover is on the rise, creating a significant problem for manufacturers and pointing up the need to use robots on the line.
  • Different temperatures – Testing a device at ambient temperature is very different from testing it at -10°C. The automotive market is a prime example of this challenge – there has been a huge increase in electronic content, and test temperatures can range from -45°C to +125°C or more in order to ensure vehicle electronics can handle a wide range of climates.

ALL of these requirements have to be addressed – the question is, how? An all-inclusive test cell, a “Rolls Royce” approach, could be developed to do everything needed, but would be extremely costly, and customers would invariably pay for features they didn’t need. At the other end of the spectrum is an application-specific test cell, which is less costly, but also less flexible. Because this type of solution can only do one particular type of test, if an application changes, a new tester would have to be purchased.

Can one SSD test system accommodate all TTM needs, handle both engineering and manufacturing environments, address the wide range of test requirements, and grow with a customer as their test needs evolve?

An SSD test platform is the answer. Comprising a family of components that can be easily mixed and matched to create new products quickly, such a system allows customers to meet their needs exactly, with no scrimping and no waste. Tomorrow, if a faster module is needed to test PCI Gen 4, the customer only has to purchase that module – the rest of system (thermal, power supplies, and other constants) can be reused, which equates to 70-80 percent of the components. By only paying for what they need, customers can extend the life of the platform over 10-15 years or more.

Scalable, flexible, affordable test solution

Advantest’s offering in this space is its modular MPT3000HVM test platform. Figure 3 illustrates how easily the system can be reconfigured to accommodate a new mix of products with different protocols.

Figure 3. As shown above, a shift in protocol mix for the SSD devices to be tested can be completed in minutes with the SSD test platform approach.

The base unit for the MPT3000HVM, called the primitive, is the secret to the platform’s success. The user starts with this unit, and then adds in components as needed to accommodate specific test demands, e.g., full protocol test or different types of test electronics. The personality of the primitive changes according to what it incorporates. If, for instance, an engineer is using a tester full of primitives doing full functional and needs to switch to BIST, he or she can reconfigure the primitive and continue to use it, simply by changing the modules.

Similarly, different form factors can be easily accommodated. Figure 4 shows several racks of MPT3000HVM primitives running tests on different device sizes. Just by changing the device interface board, any type of SSD, or even chips, can be tested in parallel. Different primitives in same system – can test all at same time, w/different protocols, form factors, test electronics – all flexibility needed. System then becomes accumulation of primitive in 19-inch rack.

Figure 4. Multiple MPT300HVM primitives, each testing a different type of SSD, can be run in parallel within the same rack.

Unique capabilities

One crucial characteristic of the platform is its powerful, easy-to-use software, which can be easily applied to the different test stages. It employs a universal GUI, so the user always sees the same interface whether working on device verification, RDT or HVM. Whether different protocols, form factors, or types of tests are involved, it’s the same software, so engineers need to be trained only once. Because of the software’s capabilities, the same set of tools can be used across all test stages, which eliminates the problem of different people not being able to access different aspects of the software and this being unable to reproduce issues. Tools in the suite include stylus main, datalog & test flow control; graph characterization; power profile; production operator interface; oven control; and calibration & diagnostics.

ATE is traditionally focused on fault detection – i.e., the chip is tested and, in general, the result is pass or fail. Testing beyond this level is unnecessary with chip test because if the chip doesn’t pass, it’s not repairable, so it’s discarded. With SSD, we are learning that pass/fail testing is not enough because they can be repaired. Customers are now expecting not only fault detection but also fault location – they need to know the root cause of the failure, and need tools to help them do this. Advantest is developing these tools, which no other test provider currently offers, to enable a wide range of fault location capabilities, incorporating FPGA technology to detect deviations as they happen.

Summary

The SSD industry requires a test platform that optimally addresses shortening time to market, ever-decreasing SSD product lifecycles, and the need to keep test costs under control even as device performance, density and variety all increase. Advantest’s proven MPT300HVM was created to resolve all these challenges, delivering a flexible, scalable platform that can handle testing a wide range of device types, speeds, form factors and other variables simply through swapping out modules to create a configuration that meets the user’s needs.

This also includes handling a variety of protocols. SATA still has high usage for low-end consumer SSD devices, but the world is moving to PCIe, both standalone and as a transport mechanism for NVMe. PCIe Gen 4 is coming soon, as is SAS 24, and the Advantest solution can handle them all, leveraging the company’s long tradition of creating platforms in a system-level offering.

Read More

Posted in Uncategorized

August Q&A Interview

Jin Yokoyama, Functional Manager of Memory Test, Advantest
By GO SEMI & Beyond staff

Advantest recently announced the T5822, the latest addition to its highly successful T5800 series of memory testers. In this issue’s Q&A, Jin Yokoyama, Functional Manager of Memory Test, talks about the new tester, which performs wafer-level test of DRAMs, NAND flash devices, and other non-volatile memories (NVMs).

What market demands prompted the development of the T5822?
Semiconductor makers need low-cost solutions for high-volume testing of price-sensitive memory ICs. The primary driver is the booming mobile-device market. While the PC market’s share of DRAM bit demand plunged to just 26 percent between 2009 and 2016, mobile DRAM bit share has grown more than 500 percent since 2009. Add in the fast-growing multilayer 3D NAND market, and you have a clear need by manufacturers of multiple memory devices for a cost-effective test system that can handle their requirements with a range of capabilities.

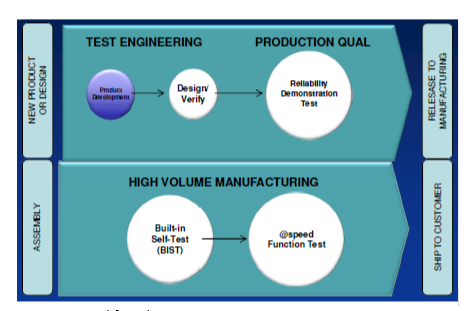
How does the T5822 fit with other current memory testers in the T5800 family?
The T5822 is designed for economical wafer-level testing by IDMs/OSATs [integrated device manufacturers/outsourced semiconductor assembly and test providers] producing or testing both DRAMs and NAND flash memories. When it comes to test coverage and functionality in between the T5822 and our existing T5833 in the wafer-level testing segment, some features do overlap. However, they can viably co-exist in the line because each system’s strength is different. For example, in addition to wafer sort, the T5833 is capable of higher-speed interface testing at the package level (i.e., final test) – it’s essentially a superset of capabilities. But at the wafer level, the T5822 will provide a wider voltage swing for some resources, allowing it to cover a wider range of customer needs – it provides greater optimization for memory wafer testing.

What degree of parallel test does the new system offer?
It depends upon each device interface specification or test mode. In general, the T5822 will be able to support up to 1,536 devices under test (DUTs) in parallel per device, and at high speed – up to 1.2 Gigabits per second.

In what geographical region do you expect demand for the T5822 be greatest?
Judging by recent M&A activity in the memory market, the pool of key memory makers/OSATs is growing more oligopolistic. Thus, we can’t say too much in this regard, as it would likely be obvious what companies we’re referencing. Generally speaking, we are expecting interest from customers that are dealing with both DRAM and NAND memory manufacturing (wafer-level testing), such as combo IDM/mixed-memory-product OSATs in the U.S. and Korea.

What are the three most important points you’d like readers to know about the new product?

  • The T5822 has been optimized with a wider voltage level swing so that the T5800 series can fully cover all memory wafer-testing segments.
  • The system has been enhanced with a compact test head that is more economical compared to our legacy general-purpose solution in our other T5800 series testers. It can be configured with a single or dual satellite test head, the latter being the most common configuration.
  • The tester is part of the proven T5800 scalable and flexible platform family, which provide high reliability and enable easy test program porting from other legacy platforms due to high software compatibility. Together with modularity, FutureSuite operating system, and memory redundancy analysis (MRA) software, these are key advantages for our target customers.
Read More

Posted in Featured Products

Five Key Success Factors for Automotive Device Test

By Kotaro Hasegawa, Senior Director, ADS System Planning Department, Advantest Corp.


The number of automotive-related semiconductor devices being designed into vehicles has been growing rapidly due to increased requirements associated with safety, in-vehicle entertainment, and advanced driver assistance systems (ADAS; see Figure 1). As ADAS content advances, we move closer to autonomous vehicle driving (Figure 2), which will require even more devices.

Figure 1. Automotive-related device market trends (Fuji Chimera Research Institute, Inc., 2017)

In turn, as this demand, goes up, production volumes for application-specific standard products (ASSPs) need to escalate. Thus, more cost-effective testing solutions are required to improve cost of test (COT) while maintaining test quality. Automotive devices must work all the time – this is a critical safety factor, made even more so in the ADAS era. Thus, maintaining high device quality in mass production is essential to developing automotive ASSP device test cells.

Below are five key factors associated with achieving testing success and helping ensure high quality as emerging automotive ASSPs enter into mass production.

Figure 2. Definition of ADAS levels (copyright SAE International, 2014)

1. Optimized Parallelism
Typically, when testing system-on-chip (SoCs) on automated test equipment, parallelism is mainly defined by resource counts. To increase the amount of parallelism, you simply add further resources onto the tester and align them with the prober or handler. Automotive ASSPs, however, involve a large amount of analog testing using an external control circuit due to the need to simulate an application model for high-quality testing. Performance board (loadboard) space is required to mount all components necessary for testing the device under test (DUT).

In many cases, even with sufficient resources on the test head, loadboard space limitations prevent achieving the desired level of parallelism, which, in turn, limits productivity. One way to address this challenge is to expand the printed circuit board (PCB) area to ensure enough space is available to mount all components, but sometimes even this step is not sufficient.

The Advantest T2000 test platform incorporates two capabilities that address these parallelism limitations, allowing it to achieve greater parallelism than competitive platforms:

  • Reduction in application relays on loadboard – up to 40 percent fewer in some cases – provided by the T2000’s multifunctional modules (Figure 3).
  • Wider PCB support with RECT550EX fixture (HIFIX) – this feature can enable a 140-pin automotive ASSP device to expand x4 DUT testing to x8 DUT testing, as an example (see Figure 4).

Figure 3. Example of T2000 relay reduction multifunctional module


Figure 4. T2000 RECT550EX fixture (HIFIX)

2. Reduced Test Time
Once devices enter high-volume manufacture, test-time reduction becomes even more critical. The T2000 includes some unique features to improve productivity while maintaining test quality, enabling best-in-class performance.

Typically, test systems require the user to power off, change mode, and power on again, but this takes a great deal of time. The T2000 architecture’s switching methodology reduces power spikes by enabling mode switching during test. This reduced switching time is ideal for devices that are extremely COT and time-to-market (TTM) sensitive, such as automotive ASSPs.
Another testing method is to monitor the output behavior of the DUT. With the T2000, the hardware module can automatically detect the device output, and if there is any change in device state, the module can halt the arbitrary waveform generator’s (AWG) input as needed and assess the test result, then immediately move on to the next test item (see Figure 5). This capability speeds the process because waiting to receive the full-scale AWG output isn’t necessary.

Figure 5. Test time reduction method on AWG

3. Wide Coverage
The T2000 features 52 test head slots, allowing a reach of more than 8,000 digital and 6,400 analog channels. This lets the user obtain the best resourcing fit, choosing from wide variety of T2000 modules available. In addition, the T2000 can deliver both high voltage (up to 2000 V) and current (up to 216 A). With this wider coverage, the platform can be utilized to test automotive ASSPs, power management integrated circuits (PMICs), light-emitting diode (LED) drivers, and other devices with high resource requirements (see Figure 6).

Figure 6. The T2000’s test segment coverage is among the industry’s widest

4. Test quality
Advantest integrated into the T2000 platform a long lifecycle, as well as testing stability, accuracy and reliability. The platform and modules possess unique hardware/software design rules in order to achieve high-quality hardware. All modules are developed based on these design rules, including selection of the ICs for the module, to help ensure high system quality and reliability. These are key factors for testing quality-sensitive devices such as automotive ASSPs.

5. Field Proven
It takes a long time to launch new automotive-related devices into the market, and the test process is highly sensitive to changes in the production environment. Selecting a proven platform that includes all necessary capabilities is key to optimal testing of automotive-related devices. In addition, newer devices targeting this market will be highly integrated to include more functionality, voltage coverage, current, and frequency. In addition to being field-proven, the test system implemented will need to offer the widest coverage so that it is flexible and extendible.

Worldwide, more than 3,900 T2000 modules designed especially for automotive ASSP testing are already installed, and further growth is expected as the market for these devices continues to expand.

Given its combination of high-quality test, high productivity and widest device segment coverage, the T2000 is well suited for testing automotive and other quality-sensitive devices.


Read More

Posted in Upcoming Events

Advantest to Debut New Solid-State-Drive Testers and Present Technical Papers at Flash Memory Summit, August 8-10 in Santa Clara, California


Advantest Corporation will showcase the latest additions to its MPT3000 series of solid-state drive (SSD) test solutions and present two technical papers at this year’s Flash Memory Summit on August 8-10 at the Santa Clara Convention Center. Advantest is an emerald sponsor of the 2017 Summit.

In booths #606-608, Advantest will present two new options for its MPT3000 platform, adding to the range of SSD protocols and form factors that it supports. The new MPT3000HES leverages the same hardware, software, thermal performance and interfaces used throughout the MPT3000 series, but in a smaller configuration designed for “copy exactly” engineering and lower-volume applications. In addition, the new Smart Power option is a highly cost-effective solution for built-in self-test (BIST) needs, including production test insertions in which a low-speed serial interface can provide maximum synergy with protocol test insertions.

Advantest’s exhibit will also feature a digital display and laptop demonstration of the cost-efficient T5851 tester for universal flash storage (UFS) devices and PCIe BGA memories. This system uses the same proven test architecture at the MPT3000 product family.

The company’s technical experts will make two presentations at the summit during Session 201-C on Testing Issues, which begins at 8:30 a.m. on Wednesday, August 9. Advantest’s Vishal Devadiya will address “Preparing SSDs for Qualification Testing” and Ben Rogel Favila will discuss “A Scalable Platform for Optimal SSD Test.”

Read More